Tuesday, September 29, 2009

Moussaka

MoussakaI was very disappointed when I read an article long time ago. The article was on a food website mentioning about “What to eat” and “What not to eat.” It was about food from all over the world. It said, “Don’t eat moussaka when you visit Greece because it is oily.”

Moussaka is one of the classic Greek dishes. In my opinion you got to eat moussaka when you visit Greece.

First of all, it is very delicious. Beef/lamb meat in sweet tomato sauce matches tasty tender eggplants and potatoes. The béchamel sauce, which is used on the top of the layers of the meat and vegetables, is very flavorsome with aromatic nutmeg seasoning. All of the layers rouse my appetite a great deal.

Next, it is time consuming if you cook it by yourself at home. Frying eggplants and potatoes, cooking meat sauce and béchamel sauce require lots of time and effort. Not to mention, cleaning after the mess in the kitchen (I love my dishwasher!). Usually it takes 2 to 3 hours for preparing/cooking and 50 to 60 minutes for baking moussaka. By the time I serve my moussaka, I am generally exhausted.

Finally, Greek restaurants use olive oil to fry (I believe) eggplants, potatoes and meat. Everyone knows olive oil is good for you since Goddess Athena sent an olive tree to the citizens of Attica as a gift for naming their city after her! So, don’t hesitate to consume olive oil.

Thus, if you visit Greece, please try this traditional Greek / Mediterranean dish!

In case, you do not trust the oil that Greek restaurants use or you do not have a plan to visit Greece soon, plus you do not mind spending lots of time and effort to cook moussaka, please refer to my recipe here and enjoy this delicious dish!

Ingredients:
5-6 sliced eggplants
5-6 peeled and sliced potatoes
1 lb of ground beef
1 chopped onion
2-3 cloves of finely chopped
3 cups of diced ripe tomatoes2 tablespoons of tomato paste
1 cup of white wine
½ cup of chopped flat-leaf parsley
A pinch of cinnamon
Salt and freshly ground black pepper
Extra virgin olive oil
½ cup of breadcrumbs
3 tablespoons of shredded/ground Parmesan cheese

Béchamel sauce:
5 tablespoons of butter
½ cup of all-purpose flour
3 cups of milk
1 freshly ground nutmeg
1 egg, beaten
2 tablespoons of lemon juice
Salt and freshly ground black pepper
3 tablespoons of shredded/ground Parmesan cheese

Directions:
1. Add plenty of water and a pinch of salt in a large bowl. Soak the sliced eggplants in the water for about 15 minutes. Drain them well.
2. Heat plenty of olive oil in a large fry pan and fry the eggplants and potatoes well. Transfer them from the fry pan. If you do not like the idea of frying the vegetables, bake them in the oven after you have sprinkled then with olive oil.
3. Heat the olive oil in the same fry pan and fry the chopped onion and garlic until they become translucent. Add the ground beef and cook till well done.
4. Add the tomatoes and tomato paste and stir them well. Add the white wine and stir the mixture well.
5. Season the mixture with salt, freshly ground pepper, and cinnamon. Turn off the heat and add the parsley and cover the pan.
6. For béchamel sauce: Heat the butter on another pan and let the butter melt completely. Add the milk and flour little by little. Stir and simmer on low heat until the mixture is thickened.
7. Turn off the heat and add the egg, lemon juice, nutmeg, salt, black pepper and Parmesan cheese. Mix them well.
8. Preheat the oven to 350 F degrees.
9. Place half of the potato slices and make a layer on the large oven pan. Next, place half of the eggplant slices and make a layer. Pour and spread half of the tomato mixture. Make one more layers in the same way. Pour the béchamel sauce and spread evenly over the top. Sprinkle the bread crumbs, the 3 tablespoons of shredded Parmesan cheese.
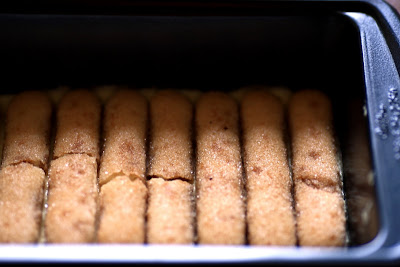
10. Bake it in the oven for 50 to 60 minutes until the top is brown.

Saturday, September 19, 2009

Castella (Honey Sponge Cake)

Castella is a very simple but delicious sponge cake made of sugar, flour, honey and eggs. It does not require any dairy products. Some in Japan say that this cake was brought from Portugal. Others say it is from Holland. Yet, it is certain that this cake was introduced in Nagasaki, Japan around the early 16th century and spread to all over Japan. Since then, it has been one of the most popular desserts in Japan.

Japan had a strict foreign policy, which isolated it from foreign countries, between 1616 and 1858. However, there were a few exceptions. Some limited places were allowed to have diplomatic relations and trades with confined foreign countries under the government of Edo. Dejima, which is a small man-made island in Nagasaki of about 3.7 acres, was one of them. Dejima was mainly open to Holland and Portugal. During the restricted foreign policy era, this tiny island became a very important site to introduce not only foreign commodities but also western medical and astronomy knowledge, and new ideas about equality and freedom. These new ideas influenced people, who eventually ended the government of Edo in 1867.

Even today, castella desert from Nagasaki is distinctive and famous for its rich honey flavor. If you ever go to Nagasaki in Japan, try castella and visit the Dejima island, which is preserved as one of the most historic sites in Japan. However, up till then, try my recipe to enjoy this simple honey sponge cake.

Ingredients:
110g of sugar
100g of all-purpose flour
4 eggs
2-3 tablespoons of honey
1 tablespoon of hot water

Directions:
1. Preheat the oven to 350 F degrees.
2. Place the honey in a small bowl and add the hot water. Mix them well.
3. Beat the egg s in a large bowl until they become foamy. Add the sugar and beat them well.
4. Add the honey mixture in the large bowl. Mix them well.
5. Add the all-purpose flour and fold them evenly.
6. Transfer the mixture into the pan and spread it evenly. In order to remove air inside of the mixture, drop the pan from a height of a few inches.
7. Bake it for 10 minutes and reduce the temperature to 300 F degree. Continuously bake it for about another 40 minutes. Do not open the oven during this process!
8. Take it out from the pan and let it cool. Wrap it with plastic wrap or aluminum foil. Refrigerate it for one or two days so that it would be richer and more flavorsome like the one in Nagasaki.

Thursday, September 17, 2009

Boiled Lobster

Boiled Lobster Lobsters in Greece are extremely tender, juicy and delicious. Unfortunately, they are very rare and expensive too. So when my husband and I found lobsters served at a restaurant in Amorgos Island, Greece, we were very excited. Most of the restaurants in Greece display fresh fish, shellfish, and meat, which are available on that day, in front of their kitchens. At that seafood restaurant, we are also welcomed to check their seafood. Sadly, the lobsters we saw were the last ones.
“Come back tomorrow. We may get them from a fisherman,” the chef said.
We came back the next day.
“I am sorry but no lobster today.”
Later, we tried again two times, but no luck.

Unluckily, my dream to eat a lobster in Greece did not come true during this summer. However, after my husband and I finished a small project for our house, we decided to celebrate with lobsters.

Our favorite local fish market carries live lobsters from Main. The store offers a boiling for the lobsters right in front of you with spicy Cajun seasoning. We bough two big lobsters and asked to boil them. They were fantastic with flavorsome Cajun seasoning. Of course, it can be also nice to simply boil and eat them in a Mediterranean way according to the following recipe.

Ingredients:
1 lobster
1 lemon
Extra virgin olive oil

Directions:
1. If the lobster is alive, put them head first into boiling water with a pinch of salt. Boil it for about 20 minutes.
2. Take the lobster from the boiling water. Remove the meat from the shell. Sprinkle the lemon juice and extra virgin olive oil. Enjoy it!

Tuesday, September 15, 2009

Myoga Pickles

Myoga PicklesThe other day I received a small package from my good friends in NY. I was so delighted when I opened this package filled with a lot of myoga buds and other Asian vegetables, which I hardly find in Louisiana. Especially, myoga is very rare. This is my most favorite Japanese herbal vegetable.

Myoga, or Zingiber mioga, is native to Japan and the buds are harvested these days --late summer to early fall. They smell like ginger but their flavor is very unique and totally different from ginger. The taste is distinctive -- crispy, slightly spicy and addictive. Finely chopped myoga buds can be used as garnish on top of salads, miso soup, tofu and many other Japanese dishes. Also myoga tempura is a very popular dish in Japan.

Since I received lots myoga buds and I do not want to spoil any of them, I decided to make myoga pickles. Finely chopped myoga pickles can be also used as garnish. They can be preserved up to two to three weeks in a refrigerator. However, I am sure they will be gone into my stomach before I realized.

If you ever find myoga buds, please try to make myoga pickles!

Ingredients:
300g –500g of myoga buds

Rice vinegar mixture:
1 cup of rice vinegar
1 cup of sake (rice wine)
1 tablespoon of sugar
A pinch of salt

Myoga PicklesDirections:
1. Place the rice vinegar, sake, sugar and salt in a pot. Bring to a boil. Then, turn off the heat and let the mixture cool.
2. Wash the myoga pieces very well. Boil water in a large pot. Add the myoga and boil them for 30 seconds to one minute. Drain them well.
3. Add the myoga in the rice vinegar mixture while the myoga pieces are still hot.
4. Fill the myoga along with the mixture in a jar/jars after the myoga cool down. Refrigerate over night and serve them with hot rice! They can preserved up to two to three weeks.

Sunday, September 6, 2009

Tiramisu

TiramisuMy husband and I occasionally go for grocery shopping right after working out at a local gym. The other day we were following this routine. While I was busy selecting tomatoes from the big pile at the grocery store, my husband put some items in our cart. Later I found three pieces of tiramisu there.
“It is more calories than we have just spent in the gym! Put them back!” I yelled at him.
He disappointedly stared at the tiramisu and said, “Yeah, that’s right… “
Then, he put them back.

I felt guilty after that. We have not had any sweets after we intensively started our exercise program in order to get rid of our extra fat we have obtained during the summer. Tiramisu is my husband’s most favorite desert. It might be too tough for him not to have his favorite sweet more than a month.

Next day, we went to the gym, again. When I started running, I realized that the TV on my treadmill was on and I tuned in on the Food channel, which was showing various kinds of fabulous sweets. Perhaps someone is telling me I should give some sweet reward to my husband and also myself. Afterward, I decided to make tiramisu.

Fresh eggsLuckily, we got super fresh and organic dozens of eggs from a local farmer family; Jim and Carolyn.

There is no comparison between homemade tiramisu and tiramisu in most of the stores or restaurants. This is because they use substitutes for eggs, cheese, and coca. Homemade tiramisu is way much better if you use the real and fresh ingredients.

TiramisuUse whipped heavy cream instead of the egg whites if you like a richer taste. Note that it would be more calories, but they are worth it ;)
TiramisuIngredients:
500g of mascarpone cheese
4 eggs at room temperature
¼ cup of sugar
40-45 of ladyfingers
1/3 cup of espresso coffee
1 teaspoon of liquor (Kahlua, rum, brandy, etc.)
3-4 tablespoons of coca powder

TiramisuDirections:
1. Separate the egg whites from the yolks. Place the egg yolks and the sugar in a large bowl (if the eggs are not super fresh and not organic, I recommend you to use a double boiler). Beat them well. Add the mascarpone cheese and mix them well.
2. Place the egg whites in a medium bowl and beat them well until foamy.
3. Add the whipped egg whites into the mascarpone mixture. Mix them evenly.
4. Combine the espresso coffee and the liquor in a flat pan. Dip the ladyfingers in the coffee mixture (do not soak them!). Place them in a single layer in the baking pan. Spread half of the mascarpone mixture evenly on the ladyfingers. Repeat the second layer of the dipped ladyfingers and the rest of the mascarpone mixture.
5. Reregulate this tiramisu mixture for about 8 hours. Sprinkle the coca on the top of the tiramisu before serving.