Tuesday, June 16, 2009

Meatballs in Tomato Sauce

Meatballs in Tomato SauceI hate Stelios, who was one of my husband’s high school classmates in Greece and he is still a good friend of my husband. Stelios is very pleasant to be with and I am always happy to see and talk to him. However, I have a reason to hate him.

When I was still living in New York City, Stelios visited my husband in Louisiana. During that time, he cooked spaghetti for my husband.
“It was mindboggling, “ my husband said.
“He boiled the spaghetti for nearly 20 minutes and it became just like the one I used to have when I was in Greece. It was so good!” He congratulated Stelios for his spaghetti. Since then he calls overcooked spaghetti, the “Stelios’ spaghetti.” This has impressed my husband very much but has made my life so difficult.

Long time ago, one of my Italian friends taught me how to boil spaghetti. First, boil plenty of water in a big pot. Add a pinch of salt. Then, coil a bunch of spaghetti and release them at once in the pot. In order to boil them the spaghetti evenly, stir them from time to time and cook for about 10 minutes or until it is “al dente” (which is Italian for having it a little bit hard on the inside). I thought this was the Mediterranean standard to boil spaghetti for a long time and more importantly, I like the “al dente” spaghetti very much.

Since Stelios made spaghetti, my spaghetti preparation became very complicated. I have to take out half of the spaghetti what I boil after about 10 minutes, and them continue to cook the rest for my husband for more than 10 minutes.

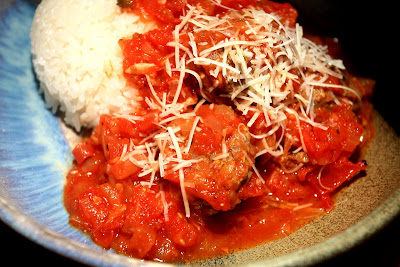
Meatballs in tomato sauce are excellent with spaghetti. However, since cooking spaghetti for my husband and myself gives me a lot of work, one day I served them with steamed rice. It went very well with meatballs in tomato sauce. Also pilaf (butter fried rice) goes well with them.

Maybe I should appreciate Stelios instead of hating him. He was the one who gave me an incredible opportunity for me to try steamed rice and pilaf with meatballs in tomato sauce, which are excellent combinations after all!
Meatballs in Tomato SauceIngredients:
Olive oil for frying

Meatballs (about 20 to 25 meatballs):
1 lb ground beef
½ cup panko (bread crumbs)
1 finely chopped onion2 cloves of garlic
¼ cup finely chopped flat leaf parsley
¼ cup finely chopped mint
1 egg
½ cup red wine
1 teaspoon salt
Freshly ground black pepper
A pinch of cumin and cinnamon
Lemon juice
½ cup all-purpose flour

Tomato Sauce:
3 cups chopped ripe tomatoes
1 finely chopped onion
3 cloves of chopped garlic
2 tbsp tomato paste
Salt and freshly ground black pepper

Meatballs in Tomato SauceDirections:
1. Place all of the ingredients except all-purpose flour for meatballs in a large bowl. Mix them well. Leave the mixture for 10 to 15 minutes in room temperature.
2. Break off pieces of the mixture and make small meatballs. Coat the meatballs with the all-purpose flour.
3. Heat the olive oil in a fry pan and fry the meatballs until they are well done. Take out the meatballs from the pan.
4. Using the same pan, heat the olive oil and fry the chopped onion and garlic for tomato sauce till the onion becomes translucent.
5. Add the chopped tomato and tomato paste. Season with salt and black pepper. Occasionally stir and cook them for 5 to 10 minutes.
6. Add the meatballs and continuously cook for 20 to 30 minutes.
7. Serve over rice/pilaf or pasta!

Wednesday, June 3, 2009

Sweet Bell Pepper Gratin

Sweet Bell Pepper Gratin“Let’s have a potluck party! I will teach you how to make gumbo soup there!” one of my girlfriends proposed after I had asked her for a gumbo soup recipe.
“That’s wonderful! I will bring fruit salad” another girl immediately responded.
Then, the other girls followed her by saying what other favorite dishes they would bring with them. I was the only one who did not come up with anything. I felt shame of myself. I am cooking and writing about food everyday but I cannot propose any dish for such a casual event!

After I came back from the lunch, I asked my husband for advice.
“How about dolmadakia?” Dolmadakia is a famous Greek / Mediterranean appetizer, sometimes called stuffed grape leaves, in which rice is stuffed in grape leaves.
It sounded like a good idea. So I sent an email to my friends that I would bring a Mediterranean appetizer.

One day before the potluck party, I went for grocery shopping for my cooking. Then, I found out some beautiful and huge red bell peppers on sale.

Things happened for a reason. After I bought a bunch of the gorgeous bell peppers, I decided to make this sweet bell pepper gratin, which is very simple yet, tasty and can be an impressive Mediterranean appetizer.

The day of the potluck party, I brought this dish with one Italian baguette. It is needless to say but the people loved this gratin. I was very happy that I received a lot of compliments about my cooking skills.
If you plan to have a potluck party and do not know what you would cook, this may be an excellent choice. I bet your people would love it and you would be proud of yourself.
Sweet Bell Pepper Gratin
Ingredients:
4 red bell peppers
¼ cup extra virgin olive oil
½ cup panko (bread crumbs)
2 cloves of finely chopped garlic
3 tbsp chopped flat-leaf parsley
Salt
Optional:
1 tbsp capers in wine vinegar
5 black olives
1 tbsp dried or fresh oregano

Directions:
1. Preheat the oven to 400 F degrees. Place the red bell peppers on the oven pan and bake them for 40 to 50 minutes until the peppers become soft and the skins turn blackened.
Or place them on the barbecue grill for 15 to 20 minutes until the peppers become soft and their skins become blackened.
2. Remove the peppers from the oven or grill and transfer to a glass bowl. Cover it with a plastic wrap and let them cool for 20 to 30 minutes (or leave the bowl cover with plastic wrap and put it in the refrigerator for 20 to 30 minutes or overnight.).
3. Transfer the peppers into a baking pan. Peel the skins and remove the seeds on the pan so that the delicious juice would not be wasted. Cut them into stripes. Place them on the baking pan.
4. Place the ¼ cup extra virgin olive oil, panko (bread crumbs), the chopped garlic, the capers, chopped olives, oregano, chopped flat-leaf parsley and a pinch of salt in a bowl Stir them well.
5. Spread out the panko mixture over the bell peppers.
6. Bake it for about 20 minutes until the panko mixture become brown.

Monday, June 1, 2009

Rice with Shrimp Scampi

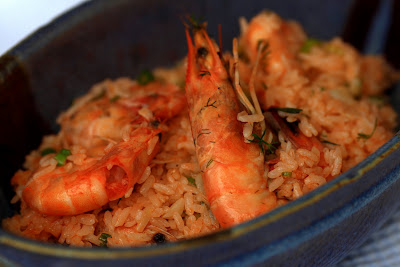
Rice with Shripm ScampiWhenever I go to a seafood restaurant or Italian restaurant, I look for shrimp scampi in the menu. Most of the time, I am disappointed to see “Linguine with Shrimp Scampi” or some kinds of pasta with shrimp scampi. Shrimp scampi must come with rice.

In the early 1990’s, my younger sister, Risa, moved to Long Island in New York to study for a few years in college. During that time, I visited her and she took me to her favorite seafood restaurant in Port Jefferson on Long Island. It was a cozy local seafood restaurant facing the port and surrounded by small cute souvenir shops.

Risa suggested to me to have her favorite dish; rice with shrimp scampi. I followed her advice. The moment the waitress brought the dish, I knew it was an excellent choice. The aroma of the shrimp and garlic made me crazy. The flavor of butter, garlic and rice brought out the delicate taste of the shrimps. That was a perfect combination for a shrimp dish.

After Risa came back from New York, I moved to New York to pursue my study in collage. Then Risa visited me and we decided to go to the restaurant in Port Jefferson, hoping to get the delicious dish, rice with shrimp scampi. However, the restaurant seemed totally different. The prices, inner and outer interiors were scaled up. Sadly rice with shrimp scampi was replace by spaghetti with shrimp scampi in the new menu. Furthermore, the taste of shrimp scampi was downgraded.

Since Louisiana shrimps are famous for their big size and fine flavor, I decided to try my dream dish, rice with shrimp scampi. I prefer to use shrimps with their heads and shells on, which gives me incredible flavor and a beautiful saffron-like color. However, if getting your fingers dirty while you are eating is not very appealing to you, use peeled and deveined shrimps. Nevertheless, they are still superb. I usually hesitate to use butter in cooking. However, butter is essential for this dish.
Rice with Shripm Scampi
Rice with Shrimp Scampi Recipe
Ingredients (4 servings):

Shrimp Scampi
2 lb shrimps with their heads and shells on
1 cup finely chopped green onions
¼ cup chopped dill
3-4 cloves of finely chopped garlic
1 cup white wine
3 tbsp butter
2 lemons
Salt and freshly ground black pepper

Pilaf (Butter Fired Rice)
2 cups rice
3 tbsp butter
2-3 cups water
Salt

Directions:
1. Wash the shrimps well and cut off their whiskers. Salt them.
2. Heat the 3tbsp of butter and the garlic in a large pan over medium heat. Add the shrimps and chopped green onions and fry them evenly for 2-3 minutes until the shrimps become pinkish. Add the white wine and lemon juice. Season them with salt and black pepper and simmer them for 2-3 minutes.
3. Transfer the shrimps into a plate and keep them aside.
4. Wash the rice well.
5. Using the same pan, heat the 3tbsp of butter and place the rice. Fry them for about 3 minutes. Add the water and a pinch of salt. Cover the pan and bring to a boil. Then, lower the heat and continue to simmer for 20 to 30 minutes until the water is absorbed.
6. Add the shrimp scampi into the pilaf (butter fried rice) and stir them well.
7. Turn off the heat and sprinkle the chopped dill.


Shrimp Scampi on Foodista

Sunday, May 31, 2009

Boiled Crawfish

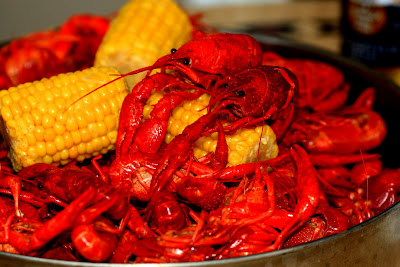
Boiled CrawfishWhen you smell boiled crawfish around your neighborhood in Louisiana, you know spring arrives. The season of Louisiana crawfish is from early spring to early summer. The best crawfish boil is done at home using a big pot with Cajun spices, potatoes, onions, corns, garlic and other vegetables and eat with many friends and family. This is one of the typical Cajun dishes. Do not hesitate to use your fingers to get dirty because this also brings the dynamic sprit of Cajun culture. Actually, it is impossible to eat crawfish without using your fingers!

Acadians, as the Cajun ancestors are known, originally came from France. In the early 1600’s, Acadians moved to settle Nova Scotia, New Brunswick and Prince Edward Island in Canada when France established its colonies there. However, after British took over the colonies from France, in 1755 many of the Acadians were brutally deported. According to Wikipedia, more than 12,000 Acadians were expelled from Canada between 1755 and 1763.

Eventually, many of the Acadians escaped to Louisiana where France had colonized. First, they arrived to New Orleans, which was already occupied by other immigrants. As a result, they were forced out further southwest of New Orleans, which were undesirable swamp areas. They had to live in horrible conditions in which the summer was terribly hot and humid and malaria and yellow fever were constantly present.

Living in an unwanted swamp region was challenging. However, this circumstance gave plenty of “spices” into the distinctive Cajun cuisine.

Crawfish has been used for just bait for a long time. They had been considered as smelly and ugly creatures. However, throughout the tough life living in swamps, Cajuns discovered their unique taste and turned them into an exquisite Cajun dish. Adding Cajun spices, vegetables and, sometimes, Cajun sausages brings out the fine flavor of crawfish in an excellent way.

Boiled Crawfish
Once a year, my husband and I decided to eat boiled crawfish to celebrate whatever we wish. This spring, we celebrated my fist spring in Louisiana and have a high regard for Cajuns who amazingly survived, thrived in this region and developed their own unique culture.

Saturday, May 30, 2009

Çoban Salata

Çoban SalataWhen Erika, one of my girlfriends, was dating with an Arabic boyfriend, she took me to a Turkish restaurant in Boston. I was very excited because it was the first time for me to taste Turkish food.
“Let’s start with Turkish salad and rice. They are really good, “ she said.
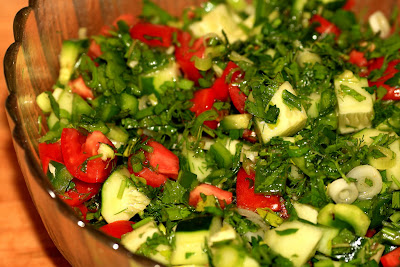
So we started with Çoban (pronounced “tso-ban”) Salata and pilaf. They were supposed to be appetizers. However, after we finished them, we decided to order the same dishes, again. I just fell in love with this simple yet delicious salad. The salad simply consists of tomatoes, cucumbers, onions and parsley. But there was some particular spice I could not figure out at that time.

Turkish food is famous for various kinds of spices. That was why I believed the salad had some special spices until just a few weeks ago when I took the first Turkish cooking class. Unexpectedly, the menu was Çoban Salata, pilaf and two other dishes. I was thrilled. Then I found out that the secret of the delicious flavor was a popular herb, mint.

Mint is very easy to cultivate. In my garden, mint grows like weeds and out of control. It had never crossed my mind that this herb gives such a precious flavor.

By the way, Erika is still a beautiful and joyful bachelorette living in Boston. Her current boyfriend is Italian. So she takes me to Italian restaurants in Italian District whenever I visit her. She introduced me to numerous kinds of good food. I admire her excellent choice of food and, of course, her patient and generous men.

Ingredients:
4 tomatoes
2 cucumbers
1 green pepper
1 cup chopped green onions
¼ cup finely chopped flat leaf parsley
¼ cup finely chopped mint
3 tbsp chopped dill
Extra virgin olive oil
2 lemons
Salt
Optional: Feta cheese

Directions:
1. Dice the tomatoes, cucumber and green pepper. Place them in a large salad bowl.
2. Add the chopped green onions, parsley, mint and dill. Pour the olive oil and sprinkle lemon juice. Stir them well.
3. Add salt and stir right before you serve. Serving with feta cheese is optional but it is good.

Wednesday, May 27, 2009

Green Beans with Tomato Sauce (Fasolakia)

One thing that extremely surprised me about my husband’s cooking is the use of lots of olive oil. His olive oil consumption is about 500ml per week. This is equivalent to mine for a few months.
“It has to be Greek, cold pressed, extra virgin olive oil,” my husband, whose native country is Greece, said and poured plenty of olive oil on meat, fish, vegetables, breads and even many of the Japanese dishes I make.

Fasolakia (or baby green beans in English) is one of the typical Greek summer dishes and requires lots of olive oil. Usually, I try to use less olive oil than my husband wishes. But for this dish, I do not hesitate to use tons of olive oil. Green beans match with tomato sauce and olive oil flavor very well.

Although green beans are a very popular summer vegetable in Japan, I did not know they are very nutritious food. Green beans are an excellent source of vitamin K, which prevents blood clotting, osteoporosis and oxidative cell damage. They are low in calories and very healthy food.
Fasolakia is usually served with feta cheese or anchovies. If you would like to try in a Greek way, cut down the salt in this dish and enjoy it with salty anchovies or feta cheese!
Ingredients:
1 lb green beans
1 chopped onion
2-3 cloves of garlic
3 cups chopped ripe tomatoes
2 tbsp tomato paste
1/2 cup extra virgin olive oil
1 bay leaf
Salt and freshly ground black pepper
Optional: 3-4 chopped potatoes

Directions:
1. Wash the green beans well. Cut off both ends. If they are too long, cut them half. If they have strings on the sides, remove the strings.
2. Heat 3tbsp of olive oil and the garlic in a large pot. Add the chopped onion and fry them until they become transparent. Add the tomatoes, tomato paste and bay leaf. Add the green beans and the chopped potatoes (optional). Season the mixture with salt and black pepper and simmer for about 30 to 40 minutes until the green beans become soft.
3. Add the 1/2 cup of extra virgin olive oil and simmer for 3 to 5 minutes. Serve this with feta cheese!

Friday, May 15, 2009

Burdock Kinpira (Kinpira Gobo)

Burdock Kinpira
Kinpira is a traditional Japanese side dish, in which small striped vegetables are fried with sweet soy sauce. Burdock kinpira is the most well known among all kinpira dishes. People started eating burdock roots about 300 years ago and at the same time kinpira became a typical home made dish. It was named after Kinpira whose father was Kintaro. Kintaro lived more than one thousand years ago and is famous from many children fair tales because of his supernatural capabilities. Since burdock is very healthy and believed to be an excellent source of energy, people named this dish after Kinpira.

Roots of young burdock are one of the most popular root vegetables in Japan. In China dried burdock roots have been used as an anti-fever and cough remedy for centuries. This vegetable is an excellent source of dietary fiber, zinc, potassium and vitamins B1 and B2. It helps to clean the stomach and intestines and to avoid constipation. Also it is high in inulin (a type of naturally occurring sugar in some plants not to be confused with insulin which is a hormone that affects metabolism), which can help to manage diabetes. However, in most of the European countries, they are treated just as weeds.

Sadly, I have not seen burdock roots in any regular grocery store here in Louisiana except in some Asian stores. Even thought I can find them in one local Asian store, most of the time, I always question the freshness of the vegetable.

The other day, I found some nice looking burdock roots at one of the Asian markets in my place. My friend, who is a nutritionist from Japan, suggested that they were fresh enough. Thus, I purchased one bag of burdock roots, nearly 2 lb, and decided to cook burdock kinpira.

Although burdock roots were not as fresh as I wanted, I really enjoyed burdock kinpira. I do not remember when I had kinpira for the last time. When I was in Japan, this dish was a common one on our family’s dinner table or in a lunch box. It reminds me of my mother’s cooking. I truly wish that people can appreciate the benefits of eating burdock roots and in the near future this vegetable would be available in many stores.

Using burdock roots and carrots is a typical combination. However, adding chicken, pork, or green beans can be more nutritious and also may become the main dish. Serve with rice!


Ingredients:
1 lb burdock
2 carrots
1 red pepper
2 teaspoon roasted sesame (both white and black sesame are fine.)
3 tbsp sesame oil (any oil for frying is fine.)

Ingredients for sweet soy sauce:
3 tbsp soy sauce
1 tbsp sake
2 tbsp mirin
1 tbsp sugar

Directions:
Scrape off the skin of the burdocks. Do not peel off since the skin has a lot of flavor.
Cut into 1.5 inch-long small sticks. Put them in a bowl and add water until all the burdock sticks are covered. Add 1 tbsp of rice vinegar. Leave them for about 10 minutes in order to remove their natural harshness.
Peel the skin of the carrots and cut them into small sticks of the same size as the burdock sticks.
Slice off the stalk and remove the seeds of the red pepper. Cut into small rings.
Heat the sesame oil in a pot. Drain the burdock sticks well. Fry them along with the carrot sticks for 2-3 minutes. Add the ingredients for sweet sauce and the red pepper. Continuously fry for another 5 munities until all the sauce is gone.
Transfer to serving plates. Sprinkle them with the roasted sesame before serving.